Italian Buttercream Master Class
When I first started cake decorating, frosting was a big mystery to me. I felt like I could self-teach myself to make cake and I knew how I wanted frosting to taste and look, but just could never find the right frosting recipes online or in recipe books. There seemed to be some sort of professional secret that all bakers were holding on to, and it seemed impossible to find anything that I could replicate at home.
My first taste of making real buttercream was at a bakery I worked at in high school. For the first time, I had the keys to the kingdom. The pastry chef I worked for had gone to the New England Culinary Institute in Vermont. She’d learned the old-school French method of cooking sugar where you “look” for signs of soft ball stage, carefully pour the cooked sugar into egg whites, then whip it until cool and fold butter in until delicious. We made a huge 6-gallon bucket of the stuff a week. I practiced in a professional setting, but I was still scared to make it at home. I didn’t understand the science behind it or how to troubleshoot when it didn’t turn out quite right. I wasted a lot of butter by throwing away ‘broken’ batches that should have been able to be saved by a quick internet search.
And then I went to culinary school myself. I learned the art behind meringue-based buttercreams: how to stabilize the emulsion, how to color, flavor, and decorate with it. And really, it’s not that hard. You shouldn’t have to go to a fancy school to find a recipe for great buttercream. This was many years ago and there are definitely lots of great recipes out there now, but I’d like to offer information on the missing piece here: the science. Great buttercream is more than an ingredient list and a method. It takes instincts, temperature control, and understanding of the emulsion you’re making. Once you understand that, you can make endless flavors and variations and always, always save it when you think it’s grainy and broken. No more wasted butter on my watch. But buckle up, this is going to be a lot of information.
By ‘meringue-based’ what I mean is a buttercream frosting made from eggs, cooked sugar, and butter. A meringue is foamed egg whites that have been stabilized with sugar. When water is added to sugar, it can be boiled to different stages of firmness at room temperature. By adding cooked (i.e. molten, hot!) sugar to whipped eggs, it brings them to a temperature safe to consume. The four main styles are Italian, Swiss, German and French. If, like me, you grew up in the U.S., you probably are familiar with American buttercream which is not meringue-based. American Buttercream is butter and confectioner’s sugar. There’s a place for it, but IMO it’s not smooth enough to use in cake decorating, and it’s super sweet which can get tricky to flavor. Here’s a quick breakdown of the four meringue-based types and their differences:
Italian: Egg whites only, cook sugar separately
Swiss: Egg whites only, cook sugar and egg whites together in a double boiler
German: Egg yolks only, cook sugar separately
French: Whole eggs, cook sugar separately
Italian/Swiss are very comparable and German/French are very comparable. For me, the goal has always been the closest to a pure white, silky smooth finish using the least amount of dishes and taking the least amount of prep time. Italian has always been my preference for those reasons. So let’s get into some tips:
Use whole eggs only. It is important to use non-pasteurized (not previously heated) egg whites. In the U.S. this means whole eggs, only. If you try to take a shortcut and use the pre-separated boxed egg whites, they will foam up to a meringue, but collapse immediately into a mess when you add the sugar. Get in the habit of cracking your eggs on a flat surface vs. the side of a bowl and they will break more cleanly in half. This makes it easier to use the shells to separate the yolk from the white, or you can crack them into a separator. However you do it, you can’t have even a speck of yolk (fat) in the egg whites or else the meringue will fall. Try separating the whites into a small bowl one at a time to avoid contaminating a big batch until you feel comfortable doing it without piercing the yolk.
Start with a clean mixing bowl. Fat, grease, oil of any kind in the meringue will cause it to fall. An electric mixer is required here, and a stand mixer, in particular, is necessary unless you have a second set of hands. Make sure that all of the parts are clean before adding the egg whites to the bowl with a whisk attachment.
Use a probe thermometer to cook the sugar. I find all of the old-school methods fascinating, including the way I initially learned which was to watch the bubbling sugar until it “slowed” in a way that I knew enough water had evaporated that it was softball stage. There are also chefs who will dip their fingers in ice water and then into the pot of molten sugar to check for softball. You do you, but I’m going to measure the temperature and remove the margin of error. Soft ball stage is 240F or 115C. This is my favorite digital probe thermometer for cooking sugar (*you cannot use an infrared - the kind that you scan and take surface temperature - for this. It has to be submerged in the liquid).
Weigh your ingredients. I started making Italian Buttercream with a volume recipe. I’ll include it below, but just know, it’s a very sensitive mixture and the only way to guarantee consistency is to weigh your ingredients. This is my favorite food scale.
Use a right-sized saucepan and add as little water as possible. When cooking sugar using a ‘wet method’, all of the sugar granules have to be wet before you add heat, but you don’t need an inch of water about the sugar line. The more water you add, the longer you have to boil the mixture to evaporate the water. Same goes for the saucepan: you don’t want one that is super shallow (especially because you’ll get very sticky overspray that is hard to clean) but you want one with about equal surface area to pan sides. The mixture should fill it about 3/4 full. Too shallow or deep will affect cooking time too.
Do not stir once the sugar is over heat. I measure the sugar into the saucepan first, then I add a little tap water to that. I may stir a tiny bit with a rubber spatula to make sure the water gets all the way to the bottom of the pan, but you don’t have to start with dissolved sugar, just wet sugar. Once the heat is on, do not stir at all. Agitating sugar as its cooking causes it to crystalize. It can also crystallize if it “climbs” up the side of the pan. To prevent this, you can brush the insides of the pan with a pastry brush during cooking to wash any sugar back down to the rest of the mixture. If you have the right-sized saucepan, this is less of a worry.
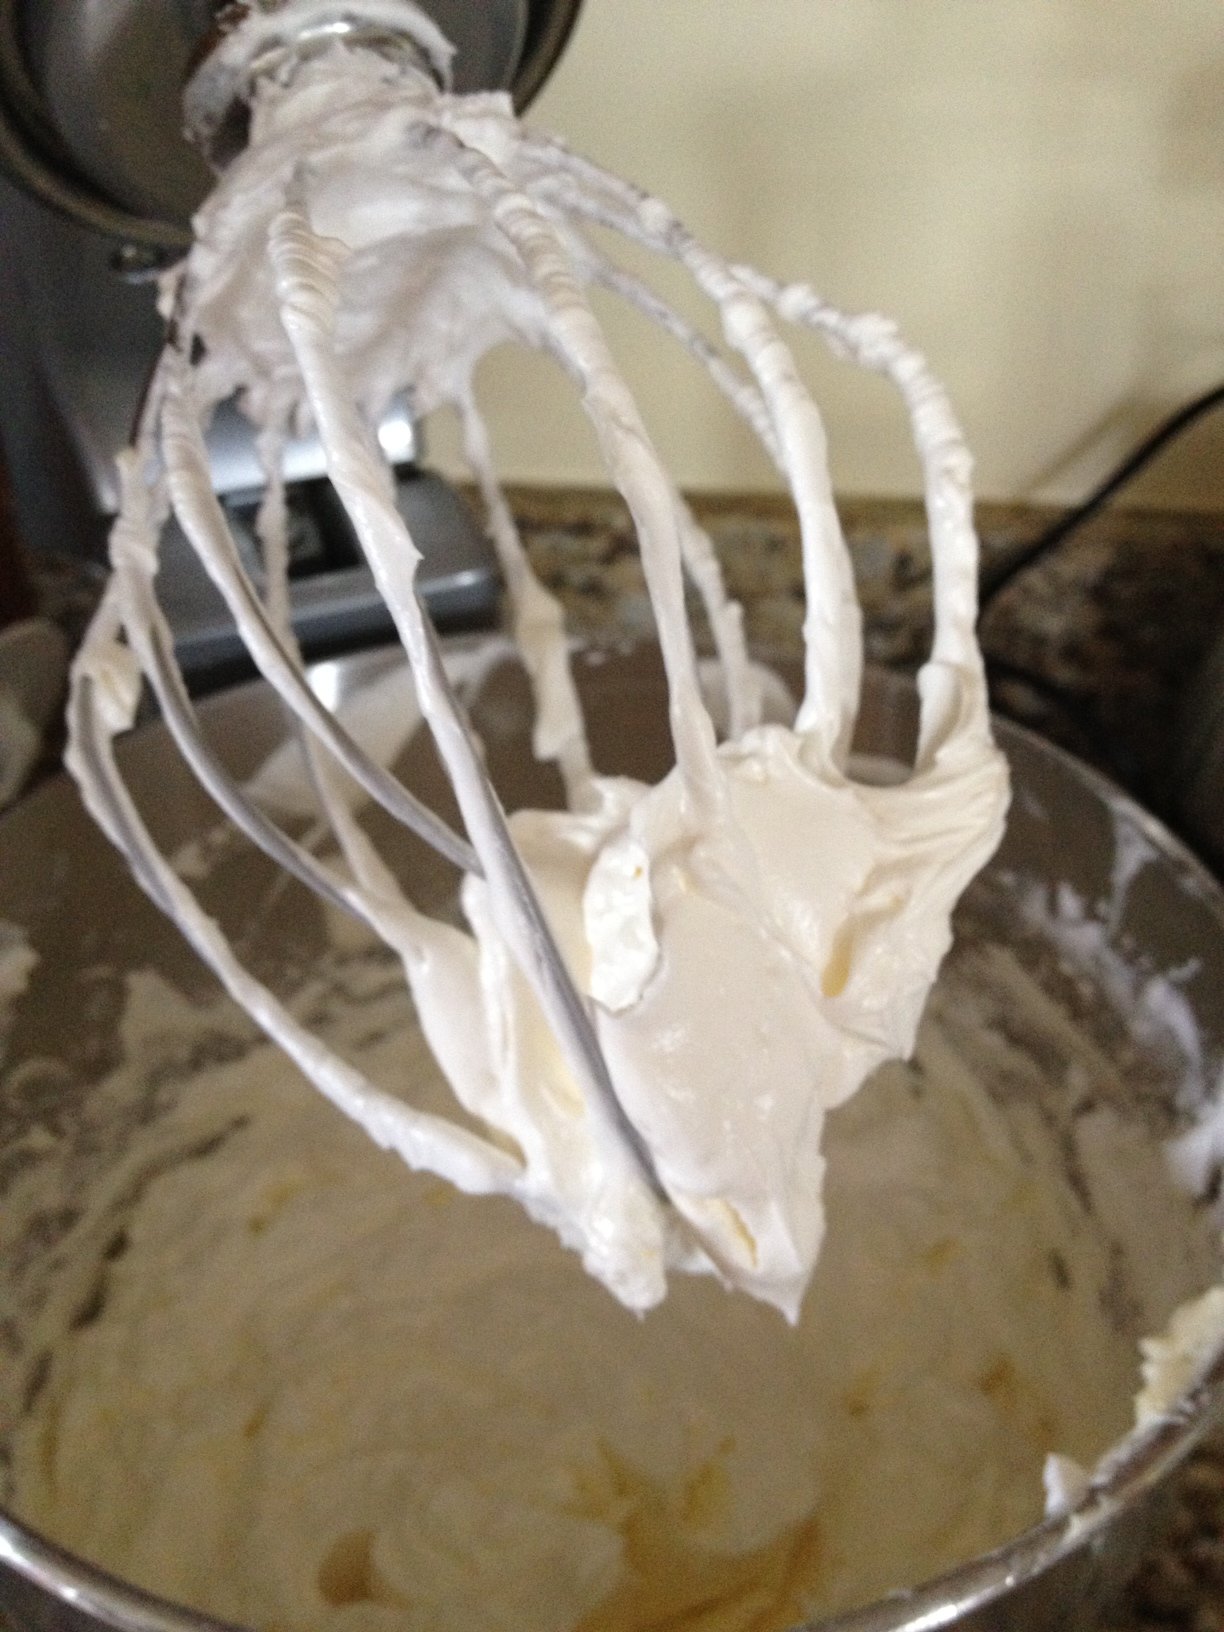
Pour the sugar into the egg whites slowly. I set an alert on my thermometer to go off at 230F. That way I know I have ten degrees to whip the egg whites and get them foamy before adding the sugar. The goal here is not to make a meringue yet, but just to get them foamy to accept the sugar. I turn the mixer back down to low/med speed and * very carefully * pour the molten sugar into the mixing bowl while it is on. This is the hardest part because everything is very hot. Once the sugar is all in there, (don’t scrape the pot or worry about the little bit that will stick behind) turn that mixer up to high speed and relax. Depending on how much you’re making, it should just take 15 minutes or so of inactive time to cool down. You need the meringue to be fluffy, white, and cool to warm before adding the butter.
Keep the mixer moving. Italian meringue (or any meringue) loves movement. It gets spongy when you stop moving it and that makes it difficult to pipe as meringue, and too late to add butter to make a silky buttercream. At this stage in the process, if you want a super smooth, beautiful meringue to top a pie, lemon bars, pipe into shapes and dehydrate until crunchy, torch up and caramelize etc. You’ve got it! Stop here.
Your butter must be room temperature. There are no shortcuts here. If you forget and try to bring your butter out of the refrigerator now, put it all in a bowl and soften it in the microwave, but that is risky business. The texture you are looking for is pommade, French for ‘lotion’. I usually have my butter out on the counter for an entire day or two before turning it into buttercream. If your house is cooler, you can also cut it up into tablespoons to help speed the process. If your mixture gets wonky after adding the butter, it’s probably due to temperature of either the meringue or butter. See the troubleshooting tips below the recipe to save it!
Use cheap butter. To be honest with you here, the whitest buttercream is made from cheap butter. The higher in fat you go, usually the more yellow the butter and there’s only so much you can do. For that reason, I usually use whatever the storebrand, unsalted version is. In culinary school we exclusively used Plugra and absolutely, it was more delicious. But it was $$$ and tinged yellow. Choose your own adventure. Add the butter all at once and continue whipping on high until it’s all incorporated, fluffy, silky, smooth, and amazing. If it’s not, see troubleshooting tips.
Still with me? Here’s the recipe:
Italian Buttercream
Ingredients
- 16 oz (1 lb) granulated sugar (2 cups)
- 8 oz fresh egg whites (about 7 large eggs, separated)
- 1 1/2 lb unsalted butter (six sticks), room temperature
Instructions
- Separate the egg whites from the yolks and add to a clean mixing bowl with a whisk attachment. Set aside.
- Add the sugar to the bottom of a medium/small saucepan with tall sides. Add enough water to the pan to wet all of the sugar- about a 1/2 cup. It's not important to measure this because you will evaporate it all off in the process anyway. The more water you add, the longer the boiling stage will take.
- Gently stir to make sure all the sugar is wet, but take care to make sure the sides of the pan are clean.
- Bring the sugar to a boil over med/high heat. Using a candy or probe thermometer, boil until the sugar reaches 240*F or softball stage. Remove from the heat immediately.
- Start whipping the egg whites on medium speed when there are about 10 degrees left in cooking the sugar. Change it to slow speed and very slowly stream in the cooked sugar, taking care to aim right between the side of the bowl and the whisk.
- Once all of the sugar has been streamed in, whip the mixture on high for 10-15 minutes. You'll see a "crown" appear around the mixing bowl when the meringue reaches its peak. Once it receeds in volume to leave the crown, you can reduce the mixing speed to medium to cut down on friction.
- Whip for another 5-10 minutes until the mixing bowl is only slightly warm to the touch at the bottom. Add in room temperature butter all at once. Increase mixing speed to high and whip for another 3-5 minutes until all the butter has been incorporated and the mixture is fluffy and smooth, scrape down the sides of the bowl if needed.
If you’ve made it this far, you’re committed. Here are my final tips for when disaster strikes, when you’re not using it right away, and when you have leftovers:
I added the butter and all of a sudden the mixture is liquidy, grainy, “fallen-and -I-can’t-get-up”. First, make sure you used fresh egg whites. If you used previously pasteurized eggs, it’s time to start over and give up. If you used fresh, just keep whipping. Touch the sides of the mixing bowl, if it’s really cold, you can use a hair dryer (or a blow torch if you’re fancy) to slightly warm it up. What’s happening is that your emulsion is separating into liquid + fat. It’s saveable! You can re-emulsify it by 1). incorporating air (whipping) 2). bringing the temperatures of the liquid and fat to a similar range (either warming the bowl or waiting it out)
I added the sugar to the meringue and now there’s a clicking sound in the mixing bowl like something solid is bouncing around in there/or the sugar is slightly caramel color when you add it to the egg whites. Sounds like you cooked your sugar too long and it was closer to hardball stage than softball. If the meringue doesn’t whip up light and fluffy in about ten minutes, it’s time to start over. Recalibrate your thermometer by putting the probe in boiling water. If it doesn’t read 212F, it might be time to get a new thermometer.
My buttercream is spongy, hard or spreads with a “bubble” texture. Use a hairdryer or blow torch to gently warm the bowl while mixing on medium speed with a paddle. It’s too cold.
I finished frosting my cake but I have leftover buttercream. It can stay out at room temperature if you have another project for it within a week. Things start to get funky after that…you can refrigerate and/or freeze buttercream for much longer. But remember, the main ingredient is BUTTER. When you take a stick of butter out of the fridge/freezer, it is hard. You’ll need to allow time for the buttercream to come back to room temperature, and even then still re-whip it for a few minutes with a paddle before using again. If you try to start whipping it when it is too cold, the emulsion will separate. See troubleshooting tip #1.
The best way to color buttercream: Gel food foloring. Most craft stores or online stores like Amazon, EvilCakeGenius, Wilton etc have great gel food coloring these days. The stuff at your regular big box grocery store is still too liquidy IMO, even if it says ‘gel’.
The best way to flavor buttercream: You can flavor buttercream using powder, liquid or gel textured flavorings, just be aware of how much liquid you are adding as it will affect the flavor. Concentrated flavors are best because butter has a fairly strong flavor on its own. I find that adding a pinch of salt along with flavorings will help bring them out more. To make chocolate, I prefer adding melted (cooled) high-quality chocolate over cocoa powder, or a combo of the two. The texture of nut butters (peanut butter, nutella, almond butter) is also PERFECT to mix into buttercream. Mix-ins like crushed cookies, sprinkles, mini chocolate chips also work great if you’re trying to add some texture.
This concludes the buttercream master-class. Always willing to answer pressing buttercream Q’s in the comments or @bakerandbranch on Instagram :-)